Powered By Blogger

Monday, April 30, 2018

More Than Words Challenge April 2018

I was inspired by this photo because the beauty of NATURE at the sea shore gives me a feeling of peace.I am inspired by the shimmer of the sun on the water, the sense of space I experience, and the always beautiful wildlife that I see there. I only live about five miles from the nearest beach at Galveston Bay. An added plus is that one of the roads on the way is lined with waterfront homes and neighborhoods. It makes for a quaint and beachy feel, and is always a pleasure to drive there. For the ANIMAL part of the challenge, I added a seahorse, two starfish, snails, a lobster, and more. 


To make this page I used Seascape, from the Wanderlust collection by Blue Fern. All the paint is from Shimmerz, the gold is mica powder. The chipboard around the frame is from Dusty Attic.


Monday, April 16, 2018

Dreamer


Hi everyone! Melissa here with my second design team page of April, for Shimmerz Paints! 
If you like paint, you will love these colors, and the type called Shimmerz is thick, ready made, and has an intense shimmer.The Inklingz are very shimmery too and are watercolors, you just spritz some water on top, and wait for a couple minutes for the paint to activate. Depending on how much water you use, the result can be thick, or thin. 


Here's how I made this page:
I mounted the photo on watercolor paper. I cut up die cuts,mostly Spellbinders, and put them around the pic. 


I stenciled on a clockface and bee using texture paste and a credit card.


I used double sided foam tape and put the pic with layers of foam core board on the sheet of Tattered Garden paper by 49 and Market. I like using tape because if I change my mind about design, it's easy to adjust, rather than tearing the paper by something that's glued on.


I added some big things like shells, glass pebbles, and flowers to support the die cut layers. There are metal pieces from Finnabair at the upper left and lower right corners. I painted the dusty attic chipboard and applied a thick layer of  Clear Rock Candy. For the paint I used Greener Pastures Inklingz first, then while it was wet, dropped in Penny 4 Your Thoughts Inklingz. You put a bunch on your brush and touch the green paint and the copper color flows right in. Be careful not to move the color around too much with your brush. I cut the Dusty Attic chipboard up and put it all over the page. I added Dear John Letter Inklingz to it, gold mica powder, and a mix of purple and blue mica powder. 


I painted the die cuts with Teal The End Of Time Shimmerz, and Greener Pastures. After I glued on micro beads and vintage glass glitter I painted on I Love You Onyxly Inklingz,I topped it with Imperial Amethyst Inklingz,a mix of watercolor crayons, and purple alcohol ink. 


I added gold mica powder to the die cuts, and also Dear John Letter. The copper and gold mica powder at the top was kind of covered up by stamped on Tsukineko chalk ink. I used a leaf stamp from Petite Poppies and sprinkled on mica powder over versamark.  Once I brushed off all the excess mica the images were too bright for the page. I smudged and inked over a lot of it.


I added a number of things for visual interest: the Tim Holtz metal butterfly, dried and pressed flowers,Spanish moss, and lichen I've collected, micro beads, vintage glass glitter, seed beeds, a few pearls, rhinestones, and Prima flowers.


A metal discovery tag by Tim Holtz, a couple fussy cuts fairies from G45, threads from plain and dyed gauze, fussy cut images of suns and moons from Stamperia paper, sequins, bling,new and old jewelry type items.


The bird at the bottom is a sticker with a clear background by 13 Arts. The title sticker is from 7 Dots.


Cut up lace, tulle, a little stencil work at the lower left and upper right corners using  Texturez Gold Mine,an art deco style costume jewelry earring art deco, from my sister in law. 


The little brass purse is from Vintaj. The green gem below it is Swarovski.  I used some green and white ball things from fall and holiday clearance flowers from Hobby Lobby.

Thank you so much for looking, and have a great week!


Monday, April 9, 2018

Surround Yourself With Love


  • Hi everyone! Melissa here with a design team page for Shimmerz Paints!  I am happy with this page, and I give a lot of credit to Shimmerz for inspiring me with not only their beautiful products, but with their kindness and support!


First I want to tell you which paints I used:

I used a set of Shimmerz new stamps too,  Petite Poppies. I used one flower several times on the page and also a leaf stamp from another set called Bed of Roses. I stamped the leaf with green Tsukineko chalk ink.

How I made this page, in a nutshell:
Apply texture paste with an old credit card and stencils to Blue Fern paper.The paper is from the  Seaside Cottage Collection. I used a stencil from TCW that has a clock frame on the outside, and a big bee on the inside. The stenciled on stars are from a Tim Holtz stencil. I used gesso and glossy accents to adhere layers of textured ribbon to the top and bottom of the page,and painted gesso oveer it. The ribbon look a little like webbing, I painted over the dried gesso with Dear John Letter. 
  Mount photo on watercolor paper, I also adhere a piece of cardstock under the pic itself to make it more durable, and flat. I give dimension to layers with layers of foam core board. 
I cut up die cuts by spellbinders and glued them on around the pic.
 Put gesso, paint, and Clear Rock Candy on chipboard. For the paint on the chipboard I used the Greener Pastures, then while it was wet, added in Penny 4 Your Thoughts. After I applied a very thick coat of Clear Rock Candy and it had dried, I rubbed on a little copper mica powder.


Once I had the above glued on, I started adding all the flowers, glitter, and other embellishments. My last step was to add Penny 4 Your Thoughts Inklingz around the photo, to extend the dark tones of the photo. Now that I've written the short version I'll note all the different sources of the papers and items.


The circle with the sun at the upper right of the photo is from Stamperia, from my local scrapstore, The Scrap Shack, in Friendswood,Texas.  The little bird and quote beneath is from Pion. Anna there gave me a huge amount of papers because she thought I did great work.
The fairy is Graphic 45, she's in the green dress at the top left of the photo.
The blue rose next to the sun paper is 13 Arts, from papers I got in a give away from Aida Domisiewicz. 
If you look to the left of the heart and home word paper, you can see where I stamped with versamark type ink, and copper mica powder.


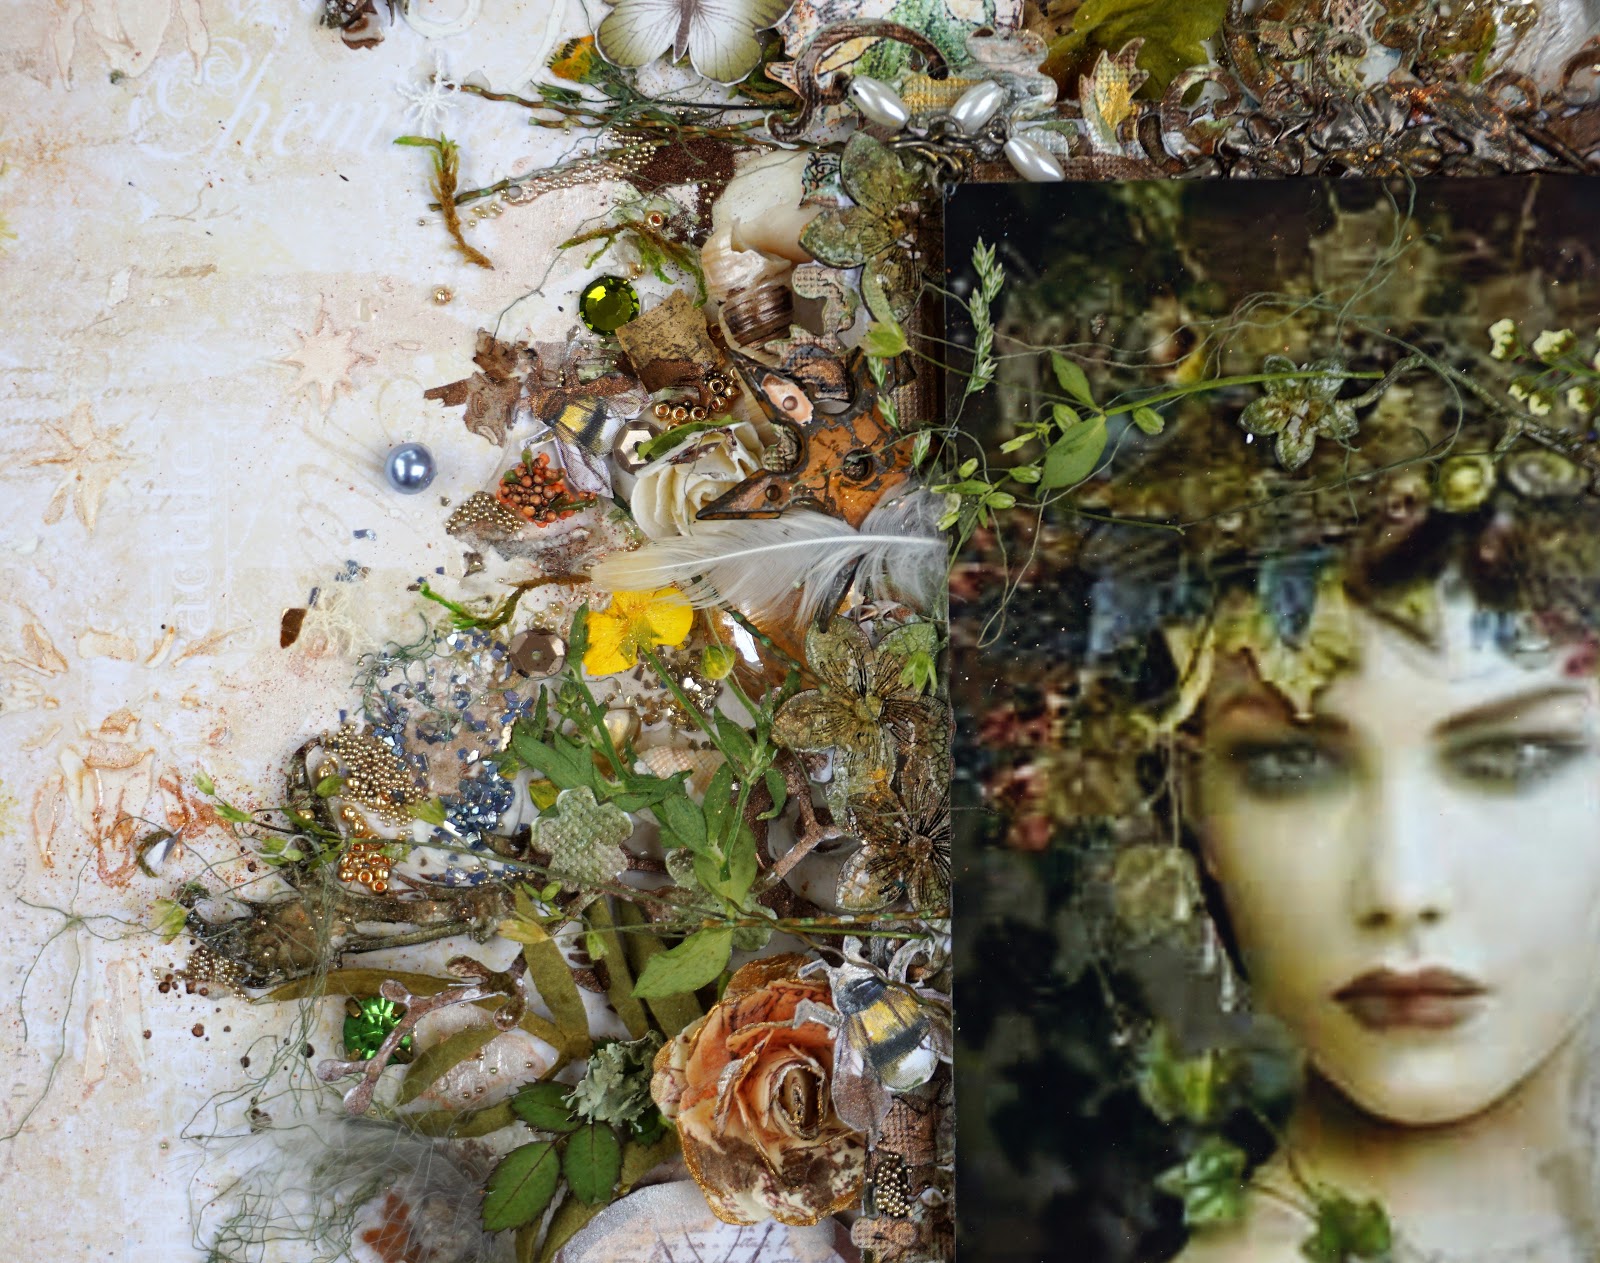
I've added a lot of pressed flowers from recent walks at the dog park Mack and I go to. The rose leaves are from my yard. The two paper roses on the page are Prima. There are also two very small white paper roses from my local scrap store(LSS) I used two glass pebbles, I mixed water and gold mica powder and painted the paper underneath the pebble, and glued the glass on. See the orange flower thing placed horizontally at the upper right of the pic? I put that there and accidentally left it there. It's from Hob Lob, I got it at the fall clearance, the tiny orange pebbly flower things are from it too. I painted over them with Penny 4 Your Thoughts. The bright yellow flowers are pressed buttercups from the park. I press all the things by putting them in a piece of paper towel, then stick them in my cookbooks in a pile.


The striped feather at the left bottom of the photo is part of a diy earring from Hobby Lobby, in the feathers section. The oval frame item is also from Hob Lob, it has an image of a hot air balloon, under a piece of acrylic.


The found objects metal tag is Tim Holtz, so are the stenciled on stars. The surround yourself with love sticker is from 7 Dots. When I was little my neighborhood was surrounded by woods and fields,and I spent a lot of time in them.This page made me think of those days, and how much I love the emotions they evoke. 
A few years ago, I found parts of a moth in my garage that had gone to moth heaven. They didn't match up to make a whole,and are so fragile, so I gently glued them on the page. 


To add visual interest I applied the following: mica flakes, micro beads, seed beads,sequins, a few Swarovski crystals,rhinestones, feathers from my yard,metal glitter, pearls, part of a broken pearl necklace,rusty metal pieces from Finnabair,lichen, shells, birch tree bark(a neighbor told me never to peel it off the tree because that could hurt the tree, so these are pieces I found on the ground by it.),lichen,dried moss, and gauze threads.


The bee by the left of the photo is from 49 and Market. I got a few pieces of paper from my LSS,there was one with just cut outs on it of fairies and things.


The cherry blossom chipboard is from Dusty Attic. 


I love the way pressed flowers look on a page.


You can see some foliage to the left of the Prima flower that's from 49 and Market.


The hummingbird is from an old calendar.


You can see copper mica powder to the left of the feather, I've been hoarding it for years, and use it very sparingly.Maybe I can find more online. It's from Jaquard at Hobby Lobby. It's coarser and shinier than regular mica powder. I used it there and around the page in a various areas. 
to the right of the grey feather at the bottom of the page I used a leaf stamp from a Shimmerz set. I used green chalk ink, and used it several more times around the page. 


Monday, April 2, 2018

Tags Using Shimmerz Paints New Stamps

 Hi everyone! Melissa here with tags using the new Shimmerz Paints stamps! I have used all their beautiful paints too.


How I made these tags:
I made watercolor paper tags, and used the "smoosh" method to paint them:I sprayed Vibez Blue Jeans four times on my craft mat and lightly pressed the tag into it. I soaked up the remaining paint onto white cardstock for future projects. I repeated the process using more Vibez sprays:Jeni B Bleu and Deep Blue Sea. I stamped on the Petite Poppy stamps using an acrylic block.
I stenciled on texture paste using a TCW stencil called "Love to Fly" on all three tags.I added more stamping,in random areas. To add visual interest I glued on micro beads, seed beads,metal glitter, rhinestones, sequins, tulle,threads of gauze, chipboard,dried flowers, Graphic 45 fussy cuts from the Fairy Dust collection, and metal. I put small amounts of Peacock's Plume Shimmerz on a small paintbrush and highlighted raised areas, the texture paste and anything that I'd put on for texture. I also brushed and sponged on gesso to highlight the textures. The gold on the tags is mica powder.


The metal on the left tag is by Finnabair, the mermaid is from Hobby Lobby, the small safety pin is from Tim Holtz. The middle tag's pin is 7 Gypsies, and so is the brass heart charm. 


The round metal pieces are from Tim Holtz.


The blue butterfly is from Hobby Lobby. The silk ribbons are from my local scrap store.


The pink color on the right side of the left tag is Dear John Letter Inklingz. 


Thank you so much for looking, and have a great week!


Tuesday, March 27, 2018

Kindness Matters


Hi everyone! Melissa here with a design team page for Shimmerz Paints!  I really enjoyed using these paints, the colors are vibrant, and oh that shimmer!


To make this page, in a nutshell, I started with a layer of paint, then applied stripes of water and dabbed off paint with a paper towel.  I sponged on gesso on a lot of the page, then painted over it with a pale peachy pink called Dear John Letter.  


Here's the longer version: I took a piece of 12 x 12 watercolor paper, glued it onto a piece of cardboard with mat medium.  I was trying to prevent warping but I wound up with some anyway.  Next time I'll tape all the edges with masking tape,like I've seen on youtubes, and skip the cardboard. 
I applied paint in sections;I brushed on water with an inch wide brush, then quickly applied paint. Here's the colors I used: At the top left ,right,and lower left you can see pink, that's a combination of A Rose(By Any Other Name) and Plum Crazy Inklingz. At the bottom left and right is a little Bumbly Bee Shimmerz. The blue on the middle of the page is Steely Eyes Blue Inklingz. The bottom half of the page has Greener Pastures Inklingz on it.


I stenciled on texture paste in a thick layer using a credit card and a stencil. When dry I brushed on paint.The purple at the top middle and bottom middle is Plum Crazy Inklingz. 


I prepped and painted the chipboard with Greener Pastures Inklingz,and coated it twice with thick layers of Clear Rock Candy Crackle. It's topped with Dear John Letter. 


The photo is mounted on watercolor paper. I gave it dimension by using foam core board. I dyed some gauze with Greener Pastures Inklingz, and added it around the photo.
To create more visual interest, I added a lot of things: pressed flowers I've been collecting lately from walks, pearls, Prima flowers,tiny white roses from my LSS, metal glitter, seed beads, micro beads, rhinestones, some Swarovski crystals, tulle, shells, sequins, and a little fairy I fussy cut, from Graphic 45.  By the time I got done I realized  the page was too busy, I needed some negative space, where the eye can rest.I brushed on quarter inch stripes of water, and dabbed them off with a paper towel, this took some of the color off. I sponged and painted on gesso. I also dry brushed a lot of the raised areas with gesso. I then went back and painted on small amounts of Honeymoon and I Love U Truly Inklingz,(pale purple and pale green), over the raised areas. For example, the gauze, raised areas of texture paste, flowers, and even some of the dried flowers.  On the left border of the page, you can see a dusky pink, it's called Gold n Roses Shimmerz. It's a fantastic color and consistency, it has texture in it almost like a very fine sand.


The tan color on the watercolor paper under the photo is A Penny For Your Thoughts Inklingz, the pink is A Rose By Any Other Name, the pale purple is Honeymoon. The title is a 7 Dots Sticker. All the pastels, and gentle feel of the page made me think that title fit.

Thank you so much for looking, and when you order, if you put my name in the comments section, you can get free paint!  Have a great week!


Thursday, March 22, 2018

Mermaid


 Hi everyone! Here's another inspiration page for the Mixed Media Warriors Challenge Blog.  Come and play with March Moodboard! 

Image may contain: text and nature


  I used almost all Shimmerz Paints on watercolor paper. The white in the background is gesso.


To make this page I spritzed a 12 x 12 sheet of watercolor paper with water, I use an empty hairspray bottle because it holds a lot, and has a nice fine mist. I sprayed three colors of Vibez Shimmers Paints on: Jeni B Bleu, Blue Jeans, and Deep Blue Sea. I used about 4 spritzes of each color. I held the paper over the sink and let the colors run together, moving the paper around. Some of the paint and water ran into the sink. I dried it with a heat tool, but the paper warped. I then had to glue the paper to a piece of cardboard using mat medium, put clips on the edges, and put it inside a book with books piled on top, all to flatten it.  
   Next time I'll glue it to the cardboard first, and then put the water and paint on.
 I was very, very impressed with the quality and color of the paint, it dries with a beautiful pearly shimmer.  


I mounted the photo on watercolor paper. Here's the layers: photo, cardstock, foam core board, watercolor paper, two more layers of foam core. I use double sided foam tape except with the double layer of foam core, where I used Elmer's glue. With a pencil I marked on the paper where I wanted the photo and stencil to go. I applied a thick layer of texture paste using a Prima stencil and a credit card. I cupped my hand around the dried paste and sprayed on the same three colors of paint and let them flow into each other.  I misted a little water on and let the colors mostly air dry.


I put the photo on the page, then put gauze around it. I had taken a piece of gauze and dyed it with Shimmerz Teal the End of Time, and Blue Print Distress Ink Dabber. I dried it with a heat gun. The piece was about an inch and a half bigger than the mounted photo. I cut a cross shape in the middle of the gauze and fit it around the pic. You can see most of it is gone. I dry brushed on different blue colors of Shimmerz, I added micro beads and other things, then started sponging on gesso. It was kind of painful to cover up areas with the white, but things were just getting too busy looking. I needed the negative space. I dry brushed more color on on top of the white, just enough to pick up the texture of the things on the page. 


To add visual interest I added a number of things along with the micro beads: seed beads, swarovski crystals, a glass vial, shells, glass glitter, gold leaf, Tim Holtz rub ons, tulle, and a little stamping. I used chipboard from my stash, prepped with gesso, and topped with Shimmerz,then Clear Rock Candy Crackle. All the gold paint on the page is Finnabair's Steampunk Copper. 


The sand colored stuff is Ranger Linen color embossing powder that I poured over glossy accents I'd rubbed on.


Thank you so much for looking, and have a great week!